目前蜗牛789使用的就是DUX主题,此款主题比较简洁,个人比较中意,但是官方证书版本比较昂贵,需要799元。目前DUX主题已经更新到5.X版本,功能也越来越完善,蜗牛789使用的主题当中有些功能是自己后期修改添加的,比如文章打赏功能,主题已经自带了。记得之前有网友问过蜗牛“DUX主题下置顶文章不显示在最新发布前面,请问DUX主题如何在最新发布前面显示顶置文章?”其实DUX4.0以上的版作者已经修复了首页最新发布不显示顶置文章的功能,但目前网络中并没有广泛流传出DUX 4.0的无限制版本。前度时间蜗牛在@蝈蝈要安静的博客当中看到一篇关于给DUX主题添加顶置功能的文章,代码比较全,而且好操作,于是就转载到自己博客做个记录。
2018.4.3更新:
蜗牛基于@蝈蝈要安静的代码做了小小的修改:
1、可以通过修改index.php文件中“ ‘cat’ => 483,” cat后面的的分类ID来达到只显示指定分类文章的顶置文章,如果不需要此功能,删除“ ‘cat’ => 483,”这段代码即可。关于如何查看分类ID可以点击查看此文章。
2、修改了“CSS样式”代码,个人觉得显示在文章右上角更美观。
3、另外需要注意的是,如果你设置首页显示2篇顶置文章,但你有2篇以上的顶置文章就会出现顶置文章下面有按钮的情况,影响整体美观,所以设置顶置文章数量的时候请留意以下。
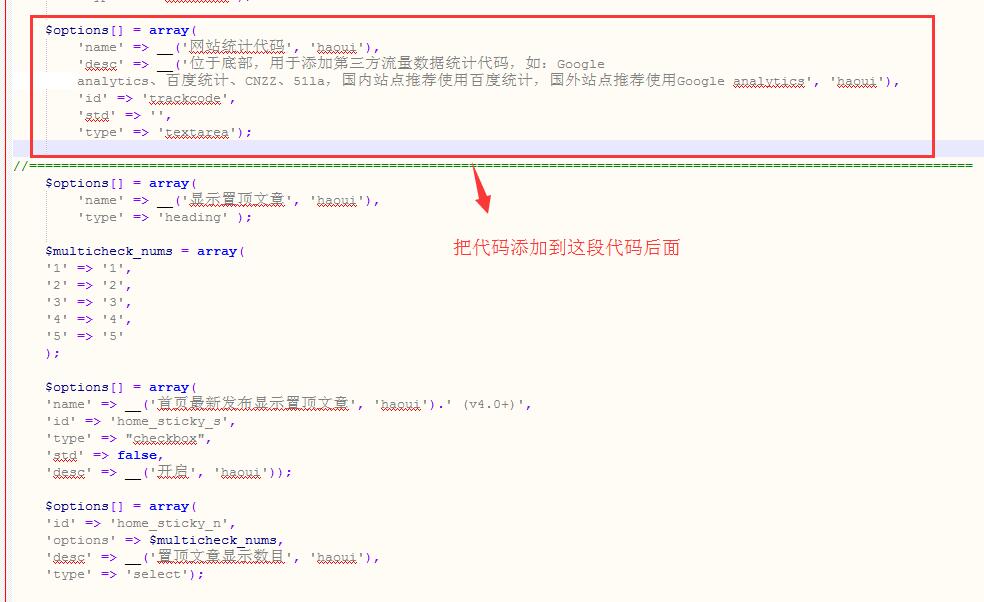
1、在DUX主题设置添加按钮。
方法很简单,我们只需要把下面代码添加到你的DUX主题的“options.php”文件当中。添加完成后,以后我们可以到DUX主题设置页面来控制是否显示顶置文章及显示多少篇文章。
$options[] = array(
 'name' => __('显示置顶文章', 'haoui'),
 'type' => 'heading' );

$multicheck_nums = array(
    '1' => '1',
    '2' => '2',
    '3' => '3',
    '4' => '4',
    '5' => '5'
);
$options[] = array(
    'name' => __('首页最新发布显示置顶文章', 'haoui').' (v4.0+)',
    'id' => 'home_sticky_s',
    'type' => "checkbox",
    'std' => false,
    'desc' => __('开启', 'haoui'));

$options[] = array(
    'id' => 'home_sticky_n',
    'options' => $multicheck_nums,
    'desc' => __('置顶文章显示数目', 'haoui'),
    'type' => 'select');
2、修改主任index.php文件。
第二步是修改DUX主题的index.php文件。在DUX主题4.0版本之前,首页有不显示“某分类”或“某ID”下文章的功能,具体代码如下:
<?php
$args = array(
    'ignore_sticky_posts' => 1,
    'paged' => $paged
);

if( _hui('notinhome') ){
    $pool = array();
    foreach (_hui('notinhome') as $key => $value) {
        if( $value ) $pool[] = $key;
    }
$args['cat'] = '-'.implode($pool, ',-');
}

if( _hui('notinhome_post') ){
    $pool = _hui('notinhome_post');
    $args['post__not_in'] = explode("\n", $pool);
}
query_posts($args);
?>
<?php get_template_part( 'excerpt' ); ?>
而DUX主题4.0之后的版本,新增了首页是否显示顶置文章的功能,所以我们只需将下面代码替换上面的代码即可。
<?php
    $pagenums = get_option( 'posts_per_page', 10 );
    $offsetnums = 0;
    $stickyout = 0;
    if( _hui('home_sticky_s') && in_array(_hui('home_sticky_n'), array('1','2','3','4','5')) && $pagenums>_hui('home_sticky_n') ){
        if( $paged <= 1 ){
            $pagenums -= _hui('home_sticky_n');
            $sticky_ids = get_option('sticky_posts'); rsort( $sticky_ids );
            $args = array(
                'post__in'            => $sticky_ids,
                'showposts'           => _hui('home_sticky_n'),
                'cat'                 => 483,//可以在这里填写显示的分类ID,就能达到只显示顶置的指定分类的效果。如果不需要请删除此段代码。
                'ignore_sticky_posts' => 1
            );
            query_posts($args);
            get_template_part( 'excerpt' );
        }else{
            $offsetnums = _hui('home_sticky_n');
        }
        $stickyout = get_option('sticky_posts');
    }


    $args = array(
        'post__not_in'        => array(),
        'ignore_sticky_posts' => 1,
        'showposts'           => $pagenums,
        'paged'               => $paged
    );
    if( $offsetnums ){
        $args['offset'] = $pagenums*($paged-1) - $offsetnums;
    }
    if( _hui('notinhome') ){
        $pool = array();
        foreach (_hui('notinhome') as $key => $value) {
            if( $value ) $pool[] = $key;
        }
        if( $pool ) $args['cat'] = '-'.implode($pool, ',-');
    }
    if( _hui('notinhome_post') ){
        $pool = _hui('notinhome_post');
        $args['post__not_in'] = explode("\n", $pool);
    }
    if( $stickyout ){
        $args['post__not_in'] = array_merge($stickyout, $args['post__not_in']);
    }
    query_posts($args);
    get_template_part( 'excerpt' );
?>
3、修改主题excerpt.php文件。
这一步很简单,是通过修改主题excerpt.php文件为顶置文章标题后面添加一个“顶置”的标识。只需把下面代码放到excerpt.php文件的echo ‘</header>’; 代码之上就OK了。
if( _hui('home_sticky_s') && is_sticky() ){
 echo '<span class="zd">置顶</span>';
 }
4、添加CSS样式。
这是最后一步,是为你上面设置的“顶置”标识添加一个样式,显得更美观一点。只需在主题的“main.css”文件当中添加下面代码即可。
.excerpt {
 position: relative;
}
.excerpt .zd {
 position: absolute;
 right: -38px;
 top: -16px;
 display: block;
 width: 76px;
 height: 20px;
 line-height: 20px;
 background: #ff5e52;
 color: #fff;
 font-size: 14px;
 font-weight: 400;
 text-align: center;
 transform: rotate(45deg);
 transform-origin: 0% 0%;
}
DUX无限制版下载方法
蜗牛789博客DUX无限制版本下载方案,使用微信扫描下面二维码关注蜗牛789微信公众号。注意是关注微信公众号, 微信公众号每天晚上推送当日热门促销活动。然后在微信公众号回复“DUX主题”即可获取下载链接。100%服务器下载版本,绿色无毒。


 蜗牛789
蜗牛789


关键只有DUX3.0
这文章怎么这么眼熟。。。
转自你的博客。
为什么我按照教程来了,一步一步修改,网站一点反应都没有呢?
大前端dux5.0.zip下载地址https://u14538544.pipipan.com/fs/14538544-293181603
有没有后门请大家自行检测。
请问下你的熊掌号怎么弄的,为什么我后台设置了,文章页不显示呢?